As exciting as it is to receive your new Achillies speaker cabinet, there are some key points we need to address to ensure you get the
maximum results. These instructions have been made as simple as possible and all wiring harnesses and speaker hardware are included with your purchase, so let’s begin!
Step 1. Lay your cabinet face down on carpet or cardboard to avoid marking the front during your speaker installation.
Step 2. Remove the back preferably with a hand held Phillips Head screw driver. You can use a cordless drill, although do not strip the screws when removing them. Make sure you have a Phillips head tip on your
cordless drill and not a Pozi Tip.
Step 3. Check that you have the correct total speaker impedance to match the jack plate you have ordered. Position your speakers onto the baffle centre, matching the speaker holes with the mounting holes on the baffle. Ensure you take note where your speaker terminals are facing.
All Achillies 4x12 cabinets will have the speaker terminals facing each other vertically.
Typhon 2x12 will have the speaker terminals facing towards each other to the centre.
The rest of the Achillies Speaker cabinet range will have the speaker terminals facing towards the top of the cabinet.
Step 4. Included in your installation kit are lock tooth washers. Place these lock tooth washers on the screws, and hand tighten all screws only into their holes (no tools for now). Ensure they turn easily with no difficulties - using power tools here risks the threads being stripped.
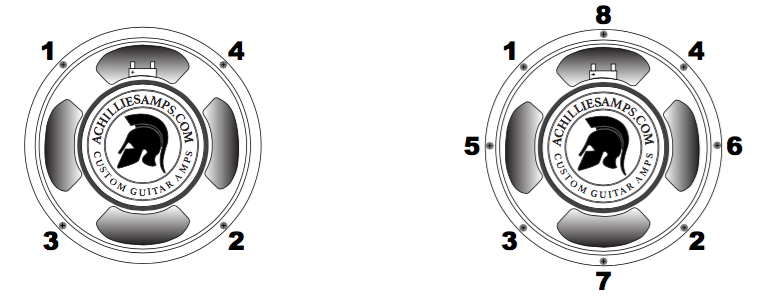
Step 5. This step is VERY Important: - You will use the same method to screw the speakers to the baffle, as you would bolt a wheel onto a car. Using ONLY your Phillips Head screw driver start on one side and tighten the screw and then directly tighten the screw on the opposite side, in an X pattern. Use this same method when removing the speaker also. The reason why this is so important is to avoid twisting or buckling the speaker frame, which could later cause voice coil rub and potentially burn out the coil.
* Follow the diagram below for reference - 4 Bolt pattern (left) 1, 2, 3, and 4. 8 Bolt Pattern (right) 1, 2, 3, etc.

Step 6. Remove the jack plate from the back panel. Now you can fit the wire terminals onto the speaker tabs. Red wire is positive (+) and Black wire is negative (-). Push the terminals gently and ensure they have been pushed all the way on, taking care to install the correct colour wire to the corresponding positive and negative spade terminals. (The same steps apply if you requested no terminals on your wires to solder them on yourself).
Step 7. Check your work again, and ensure the red and black wires match up correctly to the correspondingly marked positive and negative speaker tabs.
Step 8. Place the speaker cabinet back panel on ‘temporarily’ and feed the jack plate through the hole, and screw both the back panel and jack plate back on. You can use a drill driver although carefully install the screws on low speed. Avoid over tightening to prevent flattening the cup washers.
***Congratulations on successfully installing your speakers safely and correctly…ROCK ON!***
All written publications are reserved for Achillies Amplification


